Note

Quick Note: I've stopped using Disqus for my comment platform so all previous comments are gone, but I didn't delete any of your comments. I'm only using the default blogger comment system now.
Showing posts with label nails. Show all posts

Wednesday, July 9, 2014

Review: Ciate Shell Manicure

A while ago, a saw these Ciate Shell Manicure sets at Sephora.
They didn't have testers, but I was so intrigued and I had to buy one to try.

I had actually gone with the white pearly color called Wish Upon a Starfish, but I'll talk about that later.

So here's the mauve color called Mermaid You Look:

Here's what the paint pot polish in the kit looks like on the nails.
The color is so nice by itself that I'm sure you can wear it alone. It's nice and shiny and coats evenly.


I decided to only put the Crushed Shells on just my thumb and ring finger as accents, and I loved how the manicure looked!


The application was very easy. And I think it was so considerate of them to include a little funnel so it makes putting the left-over crushed shells back in the bottle no hassle at all.

It makes a really big difference after I put on the top coat. Without a top coat, the crushed shells looked really chalky, but after a thin layer of top coat, they were so pretty! I wouldn't put too much polish on top of the crushed shells, though, because you may take away that lovely texture. But since I haven't tried putting a very thick coat of clear polish on the shells myself, maybe you can leave a comment and tell me if it actually turns out really great =)

So my verdict:

  • The application was so easy
  • Very easy clean-up
  • The polish stays on really well (hardly chipped at all and I had worn it for over 2 weeks before taking the polish off)
  • Love the color and textures
  • Definitely recommended for nail-art lovers ;)


So what about that other white pearly color?
Here was the kit. I had initially picked this kit because I thought I could use the white crushed shells on other polish colors so it would be more versatile.

Unfortunately... This was what it looked like:
It looks almost like a bed of dried up skin cells/flakes LOL. I was pretty disgusted and I had to take it off right away.

Hope this review helps.
Maybe I just sucked at applying the crushed shells the first time so the pearly color turned out so bad. I'm sure some other people will have better skills and may love the white pearly color much more than the purple one.

Monday, March 4, 2013

Nails: Zebra Print & Glitter

I was browsing through Instagram and I saw some pretty nice looking zebra print nail art designs, so I thought I'd give my nails some zebra print love too.
Instead of doing zebra prints on the entire nail, I decided to do half of each nail with a white gradient and glitter =]


Here's a close-up

If you're interested in how I did these nails, please keep reading =D

Wednesday, January 2, 2013

Nails: Black with Gold trims

Just a quick update before I head to bed.
Here are my nails for NYE. I originally was going to do just black with a coat of gold glitter, but I saw a design similar to what I did online and I really liked it.

So here. Black with gold trims and glitter and bling =]

I was in a rush to head out to a party so these did not turn out as great as I thought (or maybe I just suck at doing these designs?)

Anyway, happy 2013!
I hope you all have had a great start to the new year!

Monday, October 1, 2012

Nails: Monochrome with a hint of color

Welcoming October with new nails!
This design was inspired by another design I saw in a magazine, which had black and white rhinestones. However, the design in the magazine was much fancier. I decided to do something more simple because I didn't want as many rhinestones.

So... here is the final result:
Monochrome, with a hint of color.

In person, the nails have a slight hint of champagne/gold (in the glitters) and a tiny bit of beige.

And a photo of my nails and a kitty paw haha

These nails were very simple and easy to do. If you are interested, please keep reading for the tutorial!

Saturday, August 18, 2012

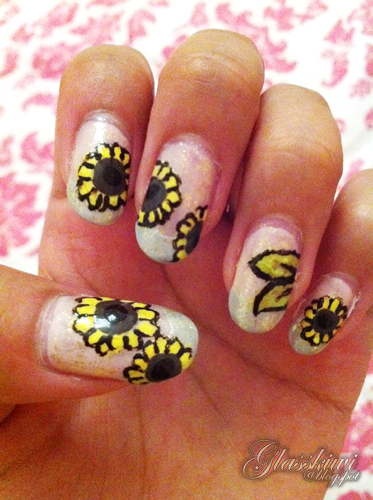
Nails: Cartoon Sunflowers

I did some cartoon sunflower nails a while ago.

In room lighting:

In sunlight:
 
Yay sunflowers. Yay summer =D

Friday, June 8, 2012

Nails: Warm Peacock

Hi all!
Finally, a nail tutorial after so long!

I'm calling this one "warm peacock" because it looks like the tail feathers of a peacock, except instead of the cool blues and greens, my nails have the warm oranges and yellows ;)


This was my first time trying out the toothpick technique. Let me know what you think =]
And if you like this design, keep reading for the tutorial.

Wednesday, June 6, 2012

A week of "new"

I'm going to keep text to a minimum and talk more about these things in future posts =]

First of all, new (stained-glass) nails!

And new nail products to pamper my nails with:

and new flip flops!

And a new accessories hanger!

Lastly, and BEST of all... a new kitten!
Meet baby Mitten, everyone =D

I have a paper to finish this week, but I promise to post my nail tutorial this week!

Thursday, April 19, 2012

Pastel Spring Nails

Spring is finally here! + I have finally finished all my exams XD
I haven't had time to do my nails at all during finals... I did not even bother shaping them (hence the ugly nails shapes in the photos later), but I just had to paint my nails today because a great friend of mine gave me a set of Essie wedding collection nail polishes as my belated birthday present yesterday. The set has four beautiful pastel colors.

All four colors in the set were so pretty, so I had to put all four colors on my nails:

You can't tell from the photos, but there is a slight shimmer in the colors, making them look even more pretty.

Matching my new nails with the season, I stuck some flower nail stickers on ;)

Sorry, no tutorial for these nails... I didn't take pictures as I painted them because I was unsure about how they'd turn out (but the design is quite simple to figure out anyway).

On a side note, I'll be flying to Hong Kong in two days!
I'll have to pack, pack, pack tomorrow.

For those who are still studying for finals - Wish you guys good luck!! (Since I needed the luck lol X_X)

Wednesday, March 14, 2012

OPI + Gem Crush

I felt like having glittery nails...

Here, I had one coat of OPI's Passion.

And then I wanted to try this new nail polish I got. It is Big Money from Sally Hansen's Gem Crush nail polish line. I applied Big Money on top of Passion.

This was just one coat of the gem crush polish:
I was surprised at how much glitter one stroke of the brush applied to my nails.

(This pic was taken under indoor lighting)

(And this pic was taken under sunlight.)

Again, photos never show how wonderful the glitter looked in real life.
My nails really looked like they had a layer of crushed gemstones coated on the top haha.
I can't wait to try the other gem crush color I got, which is called Razzle Dazzle =D

Friday, March 9, 2012

Nails: White roses & bling

Finally, a nail-art tutorial =D
I have not posted a nail tutorial in a while... but here's one now!
These nails are super girly and fun. You will get your pretty fingers noticed for sure with all the bling ;)


I did these nails for my birthday (which I will post about probably in the next post lol), but I think these are quite wearable and not too crazy, so you can actually wear them out casually - or at least, I did.

Friday, March 2, 2012

Nail tips

This is gonna be shorter post than usual.
I just wanted to share some nail tips that helped me because my nails have been chipping and cracking like mad and they are just becoming weaker than before (I guess I need more calcium).

(In case you are wondering, I am wearing OPI Sweetheart - 3 coats.)

Some of the tips may just be quite common sense or maybe you already know about them, but here goes:

  1. Always, always moisturize! - My hands are very dry to begin with, but I was so lazy to put on hand cream or lotion. However, I find that keeping your skin (and cuticles) moisturized helps =D
  2. Be gentle with your nails - I'm pretty sure this one is a given. Things like wearing gloves when you do dishes, and not using your nails as plastic wrap openers... (I used to offer to help people open things with my nails because I was always the one with the longest nails. But that was a bad idea.)
  3. Use a nail file instead of a nail clipper - I find that this is especially helpful when your nails are dry. Using a clipper can easily crack your nails. Instead, I use a nail file to trim my nails now.
  4. Shape them! - I used to always shape my nails like an oval and got cracks very easily. For some reason, when I shape my nails like rounded rectangles (like shown in the picture), they crack and chip less easily.
  5. Let your nails breathe - After covering your nails with polish for weeks, you should let them rest. I usually leave my nails unpainted for about a week or more every two nail designs (if that makes sense).

Of course, you can always treat your nails with cuticle cream and nice oils and things, but I'm just naming a few things you can do without going to the store to buy products.

Hope my tips were helpful. If you have any nail tips, please share ^_^

Tuesday, February 14, 2012

Red Valentines Day Nails

I did my nails for Valentine's Day =D
Since I literally just finished these nails like 2 hours ago, I don't have time to update with a tutorial for these nails yet because I wanna go get some sleepy now...

I'll also update with better pictures of the nails too because you can't see the shimmer. It's sad how photos always kill the effects of pretty glitters.


Anyway, I hope you all have a wonderful Valentine's Day =]
If you are single, it is a great day to mingle ;D Hahahaha

Monday, January 30, 2012

New nails that did not last

WARNING!
Rambling ahead.


I wanted to do my nails before a night out - actually, two night outs. I wanted my nails to be nice and blinged up for my nights...
HOWEVER... I was stupid enough to leave them until the last minute (okay, maybe not minute... maybe like last 2 hours). I wanted to do a tutorial for the nails, too, but I was so super rushed and I didn't have time.

To be honest, I didn't even have time to let the nails dry thoroughly before I left the house.
So what happened to them?

As you can see, the not-completely-dried polish on the thumb has been squished =(

I didn't even have time to put a top coat on the nails so some of the stones and beads fell off as well.
I forgot to take a picture of the nails before they were destroyed, but here is what my nails look like now.

A little chipped, squished, and stones/beads fallen off.

I was hoping that these could last me like two weeks because I am so lazy to redo them lol. I guess I'll have to redo them =(
Oh well... I think the color combinations could be better anyway, right? XD

I will post about my fun dine-out nights next post.
For now, here is a freaky photo of me that shows off my nails, make-up and my new color cons... So enjoy.

Thursday, January 26, 2012

Nails: Yellow Polka Dot French

Nail art tutorial, as promised ;)

These nails are super easy to do!
Please read on for the tutorial.


Saturday, January 21, 2012

Claire's Nail Polish Haul

You have probably already heard of a nail polish from Claire's that changes colors. They are called "mood polishes", but I think they just change colors according to temperature. Anyway, I have wanted to try them for a long time but (I don't know why) I never actually went to Claire's to buy any.

Today... I finally went inside a Claire's, looking for those mood polishes.
I spotted some other nail polishes that looked like good finds since they were inexpensive. Plus, they were having a buy one get one 50% off sale thing =D

Everything I got is available on their site as well. I'll add links to the products I mention.

These polishes were so cute!
I am not too crazy about the purple or the blue in this package, but I couldn't resist the cute caps.
They are called Konnichiwa Nail Polishes lol (link).

I also saw sets of mini polishes.
I grabbed the set with lots of glitter (out of stock on website - a different, but also glittery set here). These may be fun to layer with =D

Testing them out on the black cardboard box:

And finally... the mood polishes (link)!
I bought two colors... Or should I say four?

Here is what they look like on the nail:
The pink one dries up totally matte.
The purple one also turns a tiny bit matte once dried. It isn't as shiny as it looks when it is in the bottle.

So... Do they actually change colors?
Yes! That, I am very happy about =D

HOWEVER... To my disappointment, both polishes chip very easily.
I've only had the polishes on my nails for about an hour or so and look at how it is chipped already. I wasn't even doing anything vigorous - in fact, I was just sitting and watching TV.


I have still yet to try the other polishes on my nails aside from the mood ones, but now I feel like I don't even want to use them. What if I decorate my nails with the polishes and they chip off after an hour? That would be a total waste of effort.

On a different note...
My family and I are getting ready to move. I am super excited =D
I'll be packing and cleaning my room some time during the coming week... That is going to take me a while to do.

Let me show you a little corner of my room:

Lol. I literally have to step on the bags to get to my closet.
My room is going to be even smaller once we move to the new house. I'll have to learn to be neat D=

Enough rambling...
I'm going to end my post here.
I will post a nail art tutorial soon ^_^

Sunday, January 8, 2012

Deborah Lippmann polishes from Juicy

I am so excited!
I have always wanted to try out polishes from the Deborah Lippmann line. I got myself a set from Juicy Couture. They sell it in a set of 3 for $48, which means $16 for each bottle. That is not bad, considering that buying single bottles of these polishes range from $16 - $20 per bottle. When I purchased the set, Juicy was having a 30% off sale, so I feel that this set was a really good deal =D

Here's what the pretty package looks like:

The three colors (left to right):
Believe, Here Comes the Queen, Jewel in the Crown

And check out the caps of the nail polish bottles.
The tops look like rhinestones. The regular Deborah Lippmann polishes don't have these pretty caps... Juicy never fails at making their products glamorous haha.

Now, the most important part; the actual polishes.
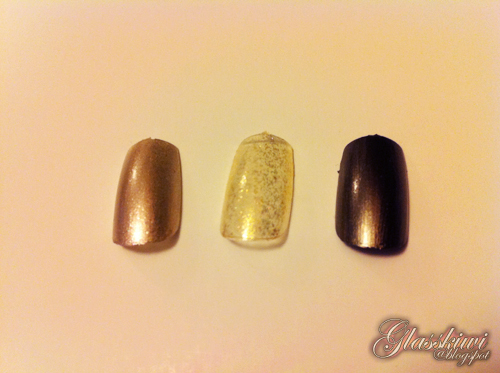
I tested out the polishes on some plastic nails:

From left to right:
Believe, Here Comes the Queen, Jewel in the Crown

Here's a closer picture of Here Comes the Queen.
The glitter/sparkles in the polish are not uniformly shaped like most other glitter polishes I have. The glitters in this polish are all different shapes and different sizes.

I decided to put a coat of that glitter on top of the other two colors.
Excuse the two dents on the left nail... I accidentally dug my nails into it before it dried.

I have not tried the polishes on my real nails yet, so I don't know if they are durable, but the application seems quite smooth from applying the polishes on the plastic nails.
I love the glitter effect that Here Comes the Queen gives... Can't wait to try these out =D (I have to wait for my chipped and cracked nails to grow out first, though.)

Friday, December 30, 2011

Nails: Glitter and shine for New Years

I am ready for NYE with my new nails. New Years calls for bling bling. Instead of stones, I used glitter and hologram flakes =]
Hope you guys like.


The flakes look more orange in the tutorial pictures because I took those pictures under a different lighting... But either way, photos never do glitter and shine any justice. I wish the glitter could show its glittery-ness in photos too =P

Wednesday, December 28, 2011

Nail stuff haul

I am so excited to share what I bought today with you guys!

After work, I had a quick browse around the mall and there was a kiosk that sold nail stuff. I knew it existed but never really got the chance to see what was there.
I found some pretty good nail stuff today and they were on sale because of boxing week =]

First... my VERY first set of nail brushes!
Yay! Now I don't have to draw with toothpicks anymore.

I picked out a bunch of glitters and some 3D flowers (which you can't really see from this picture because I did such a bad job taking the photo.)

I also bought a pack of different color hologram flakes!

And finally, I got some blank nails so I can do random designs on.
Hopefully, with these, I'll be making more nail designs and hence more nail tutorials =D

And... on a completely different note...
My brother showed me this app called Coin Dozer and I am super addicted to it now.

Basically, you drop coins and push coins off the table.
I don't know why it is so fun to push coins off the table, but it is.

Hope you all had a great and not-too-exhausting boxing week =]
Related Posts Plugin for WordPress, Blogger...