Note

Quick Note: I've stopped using Disqus for my comment platform so all previous comments are gone, but I didn't delete any of your comments. I'm only using the default blogger comment system now.
Showing posts with label nail art. Show all posts

Wednesday, July 9, 2014

Review: Ciate Shell Manicure

A while ago, a saw these Ciate Shell Manicure sets at Sephora.
They didn't have testers, but I was so intrigued and I had to buy one to try.

I had actually gone with the white pearly color called Wish Upon a Starfish, but I'll talk about that later.

So here's the mauve color called Mermaid You Look:

Here's what the paint pot polish in the kit looks like on the nails.
The color is so nice by itself that I'm sure you can wear it alone. It's nice and shiny and coats evenly.


I decided to only put the Crushed Shells on just my thumb and ring finger as accents, and I loved how the manicure looked!


The application was very easy. And I think it was so considerate of them to include a little funnel so it makes putting the left-over crushed shells back in the bottle no hassle at all.

It makes a really big difference after I put on the top coat. Without a top coat, the crushed shells looked really chalky, but after a thin layer of top coat, they were so pretty! I wouldn't put too much polish on top of the crushed shells, though, because you may take away that lovely texture. But since I haven't tried putting a very thick coat of clear polish on the shells myself, maybe you can leave a comment and tell me if it actually turns out really great =)

So my verdict:

  • The application was so easy
  • Very easy clean-up
  • The polish stays on really well (hardly chipped at all and I had worn it for over 2 weeks before taking the polish off)
  • Love the color and textures
  • Definitely recommended for nail-art lovers ;)


So what about that other white pearly color?
Here was the kit. I had initially picked this kit because I thought I could use the white crushed shells on other polish colors so it would be more versatile.

Unfortunately... This was what it looked like:
It looks almost like a bed of dried up skin cells/flakes LOL. I was pretty disgusted and I had to take it off right away.

Hope this review helps.
Maybe I just sucked at applying the crushed shells the first time so the pearly color turned out so bad. I'm sure some other people will have better skills and may love the white pearly color much more than the purple one.

Monday, March 4, 2013

Nails: Zebra Print & Glitter

I was browsing through Instagram and I saw some pretty nice looking zebra print nail art designs, so I thought I'd give my nails some zebra print love too.
Instead of doing zebra prints on the entire nail, I decided to do half of each nail with a white gradient and glitter =]


Here's a close-up

If you're interested in how I did these nails, please keep reading =D

Wednesday, January 2, 2013

Nails: Black with Gold trims

Just a quick update before I head to bed.
Here are my nails for NYE. I originally was going to do just black with a coat of gold glitter, but I saw a design similar to what I did online and I really liked it.

So here. Black with gold trims and glitter and bling =]

I was in a rush to head out to a party so these did not turn out as great as I thought (or maybe I just suck at doing these designs?)

Anyway, happy 2013!
I hope you all have had a great start to the new year!

Monday, October 1, 2012

Nails: Monochrome with a hint of color

Welcoming October with new nails!
This design was inspired by another design I saw in a magazine, which had black and white rhinestones. However, the design in the magazine was much fancier. I decided to do something more simple because I didn't want as many rhinestones.

So... here is the final result:
Monochrome, with a hint of color.

In person, the nails have a slight hint of champagne/gold (in the glitters) and a tiny bit of beige.

And a photo of my nails and a kitty paw haha

These nails were very simple and easy to do. If you are interested, please keep reading for the tutorial!

Saturday, August 18, 2012

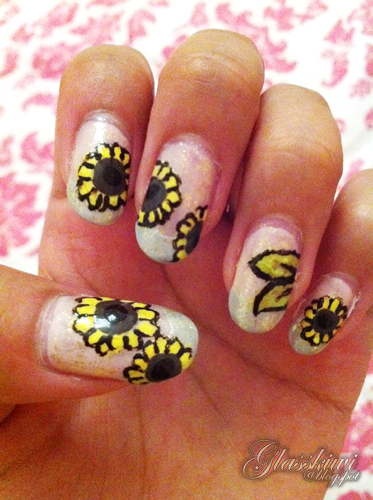
Nails: Cartoon Sunflowers

I did some cartoon sunflower nails a while ago.

In room lighting:

In sunlight:
 
Yay sunflowers. Yay summer =D

Friday, June 8, 2012

Nails: Warm Peacock

Hi all!
Finally, a nail tutorial after so long!

I'm calling this one "warm peacock" because it looks like the tail feathers of a peacock, except instead of the cool blues and greens, my nails have the warm oranges and yellows ;)


This was my first time trying out the toothpick technique. Let me know what you think =]
And if you like this design, keep reading for the tutorial.

Wednesday, June 6, 2012

A week of "new"

I'm going to keep text to a minimum and talk more about these things in future posts =]

First of all, new (stained-glass) nails!

And new nail products to pamper my nails with:

and new flip flops!

And a new accessories hanger!

Lastly, and BEST of all... a new kitten!
Meet baby Mitten, everyone =D

I have a paper to finish this week, but I promise to post my nail tutorial this week!

Thursday, April 19, 2012

Pastel Spring Nails

Spring is finally here! + I have finally finished all my exams XD
I haven't had time to do my nails at all during finals... I did not even bother shaping them (hence the ugly nails shapes in the photos later), but I just had to paint my nails today because a great friend of mine gave me a set of Essie wedding collection nail polishes as my belated birthday present yesterday. The set has four beautiful pastel colors.

All four colors in the set were so pretty, so I had to put all four colors on my nails:

You can't tell from the photos, but there is a slight shimmer in the colors, making them look even more pretty.

Matching my new nails with the season, I stuck some flower nail stickers on ;)

Sorry, no tutorial for these nails... I didn't take pictures as I painted them because I was unsure about how they'd turn out (but the design is quite simple to figure out anyway).

On a side note, I'll be flying to Hong Kong in two days!
I'll have to pack, pack, pack tomorrow.

For those who are still studying for finals - Wish you guys good luck!! (Since I needed the luck lol X_X)

Friday, March 9, 2012

Nails: White roses & bling

Finally, a nail-art tutorial =D
I have not posted a nail tutorial in a while... but here's one now!
These nails are super girly and fun. You will get your pretty fingers noticed for sure with all the bling ;)


I did these nails for my birthday (which I will post about probably in the next post lol), but I think these are quite wearable and not too crazy, so you can actually wear them out casually - or at least, I did.

Tuesday, February 14, 2012

Red Valentines Day Nails

I did my nails for Valentine's Day =D
Since I literally just finished these nails like 2 hours ago, I don't have time to update with a tutorial for these nails yet because I wanna go get some sleepy now...

I'll also update with better pictures of the nails too because you can't see the shimmer. It's sad how photos always kill the effects of pretty glitters.


Anyway, I hope you all have a wonderful Valentine's Day =]
If you are single, it is a great day to mingle ;D Hahahaha

Monday, January 30, 2012

New nails that did not last

WARNING!
Rambling ahead.


I wanted to do my nails before a night out - actually, two night outs. I wanted my nails to be nice and blinged up for my nights...
HOWEVER... I was stupid enough to leave them until the last minute (okay, maybe not minute... maybe like last 2 hours). I wanted to do a tutorial for the nails, too, but I was so super rushed and I didn't have time.

To be honest, I didn't even have time to let the nails dry thoroughly before I left the house.
So what happened to them?

As you can see, the not-completely-dried polish on the thumb has been squished =(

I didn't even have time to put a top coat on the nails so some of the stones and beads fell off as well.
I forgot to take a picture of the nails before they were destroyed, but here is what my nails look like now.

A little chipped, squished, and stones/beads fallen off.

I was hoping that these could last me like two weeks because I am so lazy to redo them lol. I guess I'll have to redo them =(
Oh well... I think the color combinations could be better anyway, right? XD

I will post about my fun dine-out nights next post.
For now, here is a freaky photo of me that shows off my nails, make-up and my new color cons... So enjoy.

Thursday, January 26, 2012

Nails: Yellow Polka Dot French

Nail art tutorial, as promised ;)

These nails are super easy to do!
Please read on for the tutorial.


Friday, December 30, 2011

Nails: Glitter and shine for New Years

I am ready for NYE with my new nails. New Years calls for bling bling. Instead of stones, I used glitter and hologram flakes =]
Hope you guys like.


The flakes look more orange in the tutorial pictures because I took those pictures under a different lighting... But either way, photos never do glitter and shine any justice. I wish the glitter could show its glittery-ness in photos too =P

Wednesday, December 28, 2011

Nail stuff haul

I am so excited to share what I bought today with you guys!

After work, I had a quick browse around the mall and there was a kiosk that sold nail stuff. I knew it existed but never really got the chance to see what was there.
I found some pretty good nail stuff today and they were on sale because of boxing week =]

First... my VERY first set of nail brushes!
Yay! Now I don't have to draw with toothpicks anymore.

I picked out a bunch of glitters and some 3D flowers (which you can't really see from this picture because I did such a bad job taking the photo.)

I also bought a pack of different color hologram flakes!

And finally, I got some blank nails so I can do random designs on.
Hopefully, with these, I'll be making more nail designs and hence more nail tutorials =D

And... on a completely different note...
My brother showed me this app called Coin Dozer and I am super addicted to it now.

Basically, you drop coins and push coins off the table.
I don't know why it is so fun to push coins off the table, but it is.

Hope you all had a great and not-too-exhausting boxing week =]

Sunday, December 25, 2011

Gift-wrap nails

I know it's a little too late to post this tutorial now since it is already Christmas Day today. (I hope you are all having a wonderful Christmas!) I actually did these nails two days ago but I haven't had the chance to update... but here it is...

My nail tutorial on some gift-wrap inspired nails =]


I just have to say that the brown and the red looked better together in my head than on the real thing, so you may wanna substitute the colors if you don't like the combination.

Monday, December 19, 2011

Christmas Nails: Gold and red

Yay! New nails =D
This time, I made them super Christmasy haha.


I must apologize in advance about the quality of the photos.
I still haven't gotten myself a new camera yet and so all my photos are still taken with my phone. On that screen, the pics looked fine, but when they are blown up on the computer screen, I see that some of the weren't even in focus =_=.

As usual, a tutorial follows...

Wednesday, December 14, 2011

Ready for the holidays

Exams are over (or at least for me, they are haha)... which means I can finally start enjoying my holidays!
Well, not really... because of work =(

But nonetheless, my holiday spirit will not be affected!

My friend really liked my snowflake nails I did last time (see tutorial here), so I did hers too... except with a twist. I added snowmen on her thumbs =D

And then, of course, I did my own nails too.
Mine are not holiday-themed, though. I have a Christmas themed nail design thought up in my head but I want to save that design for when it gets closer to Christmas.

Also, to go with my holiday spirit, I bought a pair of gold glittery pumps!
I actually did not intend on buying any new shoes for the holidays but I guess it was fate that I saw a pair of super pretty pumps that fit me - which surprised me since I am a size 4 - 4.5 feet size.

And you can't have holidays without including something fuzzy, right?
So here... I present you... a picture of me in a fuzzy sweater with my fuzzy cat hahaha

I got this sweater a few months back when I was in Hong Kong.
The detail on the back is so cute =]

Sorry I keep saying I will post up a nail tutorial soon but not doing so...
I will get my lazy ass around to doing it soon. I promise! Haha

Are you guys getting into the holiday mood too? ^u^

Monday, December 5, 2011

Nails: Snowflakes

I know it's only been a short while since my last tutorial but I was inspired by the disgusting cold weather and some of the pretty snowflake nails I've seen other people do.
So I've decided to do my own snowflake nails =]

Here's my take on this wintery themed nail art:

The tutorial for these nails is longer than other tutorials just because I want to show the steps for drawing the snowflakes =]

Wednesday, November 30, 2011

Nails: Leopard Glam

First attempt at a leopard print design.
Here's what the final result looks like:
(Excuse the awkward and creepy position of my hand because for some reason this hand gesture showed the design the best lol)
Say hello to Ms.Grabb-Creepy Hand:

The leopard print turned out okay. I thought it would look really bad on my fingers but I guess it's not too bad. I already have another idea for the leopard print design right after I did this one, haha.

Tuesday, November 22, 2011

New nails!... I couldn't wait anymore

My nails have become really damaged. They are thin and brittle... and they keep breaking like crazy. I was going to wait until they are back to normal before I started doing anything with them again... but I couldn't wait anymore. They are almost all back to normal... So I started painting them lol.

Here's what I did with my nails this time.
If you like them, read on for the tutorial =]

Related Posts Plugin for WordPress, Blogger...